Build your private AI image generator for enterprise‑grade creativity, control, and privacy.

Written by Henry Navarro
Introduction 🎯
Video in spanish 🇪🇸 here
If you’ve followed the last two tutorials (tutorial 1, tutorial 2), you already know how to deploy your own private GPU infrastructure and use it for image generation. Today, we’re taking that one step further, turning that same infrastructure into a Private AI Image Generator, fully integrated with your Open WebUI chat interface.
Unlike corporate AI platforms that log prompts or restrict creativity, this setup guarantees your privacy. Everything happens in your servers, with your GPUs, using open-source tools. You’ll learn how to connect ComfyUI to Open WebUI so you can generate images directly from a chat, just like ChatGPT, but 100% private.
Recap: Setting up your Private GPU Environment 💻
If you haven’t already, start by deploying ComfyUI on your private instance using platforms like Vast.ai.
This will serve as the foundation for your private ai image generator.
In previous guides we showed how to:
- Create a Vast.ai GPU instance (e.g., my RTX 4060 (id 44147) or RTX 5090 (37748))
- Access it through Jupyter terminal for download the models (Check here if you don’t know how to download the models).
- Install ComfyUI text-to-image workflow with Qwen Image for local image generation
Once running, your instance hosts ComfyUI on a customizable URL (e.g. https://your-instance.vast.ai.trycloudflare.com), which we’ll connect to Open WebUI shortly.

Integrating ComfyUI with Open WebUI 🧩
Let’s bring the two worlds together, the chat frontend and the image-generation backend.
Step 1. Retrieve your ComfyUI API Token
In your Jupyter terminal (from your Vast.ai instance), run:
echo $OPENBUTTON_TOKENThis gives you the API token that Open WebUI requires to verify your ComfyUI connection.

It should look like this

Step 2. Connect ComfyUI to Open WebUI
Go to your Open WebUI → Admin Panel → Images Section By default, it uses OpenAI. Replace this with your ComfyUI endpoint and token:
- Endpoint URL: The URL from your Vast.ai instance
- API Token: The
$OPENBUTTON_TOKENvalue
Click Verify Connection, it should display “Server connection verified”.

Step 3. Export your ComfyUI Workflow as JSON
Inside ComfyUI:
- Click on Export → Export as API
- This downloads a
.jsonfile of your workflow setup - Upload that
.jsonin Open WebUI using “Upload Workflow”
This file defines all nodes, parameters, and model configurations your private ai image generator will need.

Step 4. Assign Workflow Node IDs
Every ComfyUI workflow uses internal node IDs (prompt input, checkpoint model, image dimensions, etc.).
In Open WebUI, assign:
Prompt Node: 6
Checkpoint Node: 37
Steps & Seed Node: 3
Height + Width Node: 58
(These correspond to the same IDs we used in the tutorial video.)
After saving changes, reload your Open WebUI page to enable the new configuration.
Activating Your Private AI Image Generator 🔐
Now it’s time to test everything.
- Go back to your chat.
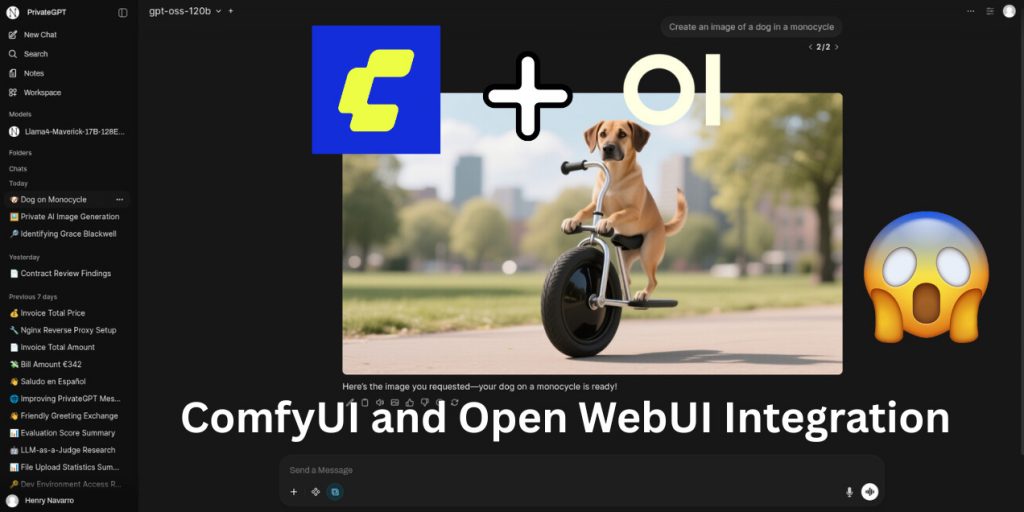
- Type something like:
Create an image of a dog in a monocycle
What happens next:
- Open WebUI sends the prompt to ComfyUI
- The workflow processes it using your selected checkpoint model
- The result: an AI-generated image appears in your chat window!

Everything runs from your own environment, with no third-party servers, no data tracking, and no external storage. That’s what makes this a true private ai image generator.
The integration doesn’t stop with text-to-image creation. You can also:
- Edit generated images directly within Open WebUI
- Change the checkpoint model to experiment with different styles
- Add new ComfyUI templates for specific workflows (image editing, text-to-image, or even controlnet variations)
Use the “Edit Image” section in Open WebUI to modify generated visuals, change colors, enhance lighting, or re-style assets, all while running privately on your GPUs.
All-Private Image Generation for Enterprise 🚀
By connecting ComfyUI and Open WebUI, you’ve created a self-contained private AI image generator, no API limits, no prompt logging, no subscription models.
Everything operates locally or within your rented GPU environment, letting you:
- Save on costs (less than $0.50/hr on Vast.ai)
- Keep full control over prompts and generated data
- Integrate and expand with your own business AI workflows
This architecture proves how easily open-source tools can replicate and surpass commercial systems, while keeping your creativity and privacy intact.
You can test this entire setup for free for one week at 👉 chat.privategpt.es
After that, explore renting your own GPU instance or contact us to scale your workflow.
At NeuralNet Solutions, we specialize in building private AI ecosystems like this one, integrating ComfyUI, Open WebUI, and PrivateGPT for enterprise and creators alike.
📅 Book a Free 30-Minute Consultation Let’s create your next private ai image generator or custom AI content pipeline, you can contact us here.
👉 Schedule Here 🌐 Website: neuralnet.solutions 💼 LinkedIn: Connect with Henry
#PrivateAIImageGenerator #ComfyUI #OpenWebUI #PrivateAI #OpenSourceAI #AIInfrastructure #AIAutomation #NeuralNetSolutions