
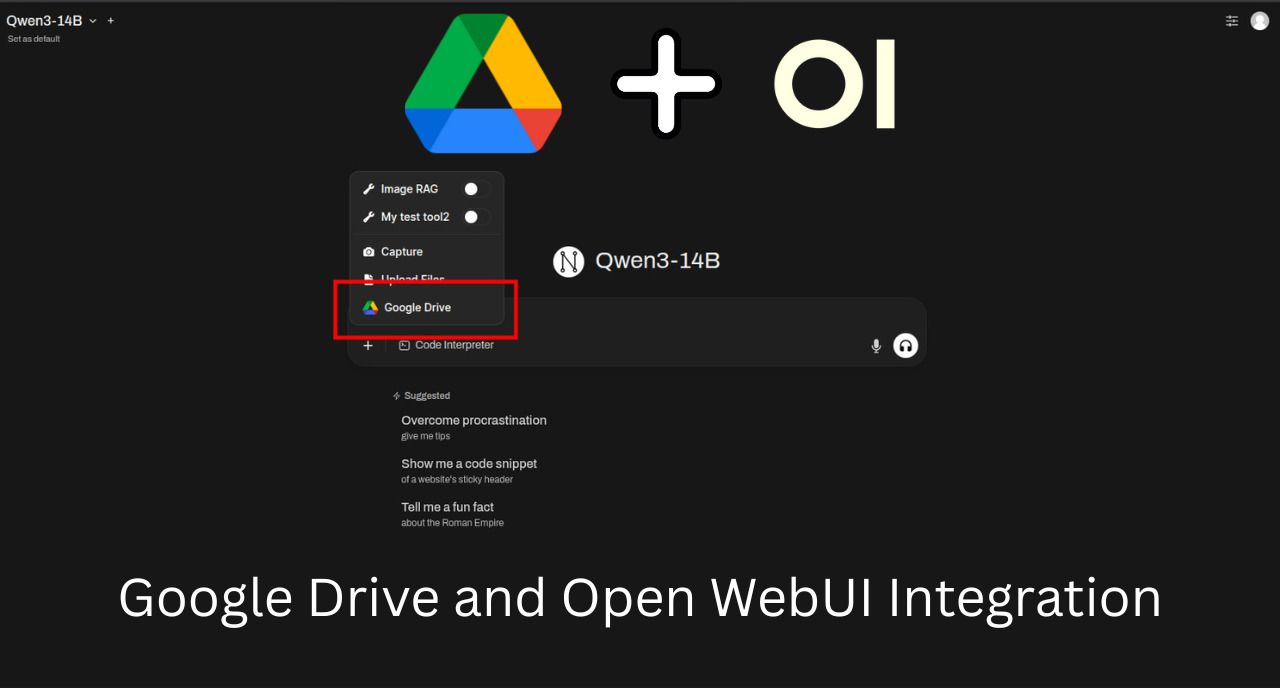
Chat with your Google Drive documents using private AI models without sending data to third parties

Written by Henry Navarro
Introduction 🎯
In my previous article, I showed you how to deploy Open WebUI with 100% private HTTPS security. Today, I want to take that deployment to the next level by adding a powerful new functionality: integrating your Google Drive documents so you can chat with them in complete privacy.
Imagine you’re a company that has contracted Google’s suite of services, and you want to leverage AI to interact with your documents without sending any data to external providers like OpenAI or Anthropic. This is exactly what I’m going to teach you how to accomplish.
This integration allows you to:
- Chat with your Google Drive documents using your private AI models
- Maintain complete data privacy – nothing leaves your infrastructure
- Leverage existing Google Workspace investments while keeping AI processing local
- Access documents seamlessly through a familiar chat interface
The best part? All of this happens within your secure Open WebUI instance, meaning your sensitive business documents never touch third-party AI services.
Prerequisites 📋
Before we begin, make sure you have:
- A working Open WebUI deployment (follow my previous tutorial if you need this)
- A Google account (Gmail)
- Access to Google Cloud Console
- My Open WebUI repository cloned locally
If you don’t have Open WebUI deployed yet, you can find the complete setup guide in my previous article or use the repository from my company NeuralNet.
Setting Up Google Cloud Console 🌐
The first step to integrate Google Drive with your Open WebUI instance is creating and configuring a project in Google Cloud Console. This will give us the necessary API credentials to securely connect your Google Drive documents.
Step 1: Create a Google Cloud Project If you don’t already have a Google Cloud project, you’ll need to create one:
- Go to console.cloud.google.com
- Click on “Create Project”
- Give your project a descriptive name (e.g., “OpenWebUI-GoogleDrive”)
- Click “Create”
The console will redirect you to your newly created project dashboard.
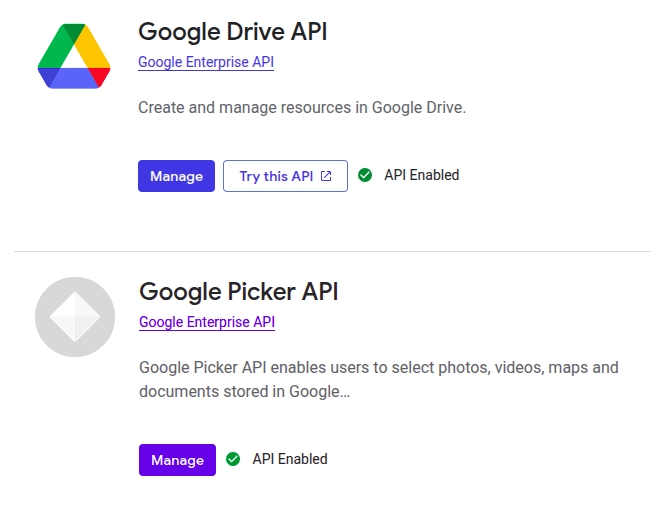
Step 2: Enable Required APIs Navigate to APIs & Services in the left sidebar. We need to enable two specific APIs for this integration to work:
Enable Google Picker API:
- Click on “+ Enable APIs and Services”
- Search for “Google Picker API”
- Click on it and press “Enable”
The Google Picker API allows users to select documents through a small popup window interface – this is what creates the document selection experience you’ll see later.
Enable Google Drive API:
- Return to the APIs library
- Search for “Google Drive API”
- Click on it and press “Enable”
This API provides the actual access to read and retrieve documents from Google Drive.
Creating API Credentials 🔑
Now we need to create the credentials that will allow Open WebUI to authenticate with Google’s services.
Step 1: Create an API Key
- In the left sidebar, go to “Credentials”
- Click “+ Create Credentials” → “API Key”
- Copy the generated API key and save it in a plain text file
- Important: Keep this API key secure – we’ll need it later for our Open WebUI configuration
Don’t worry about exposing this key temporarily during setup; you can always regenerate it if needed.
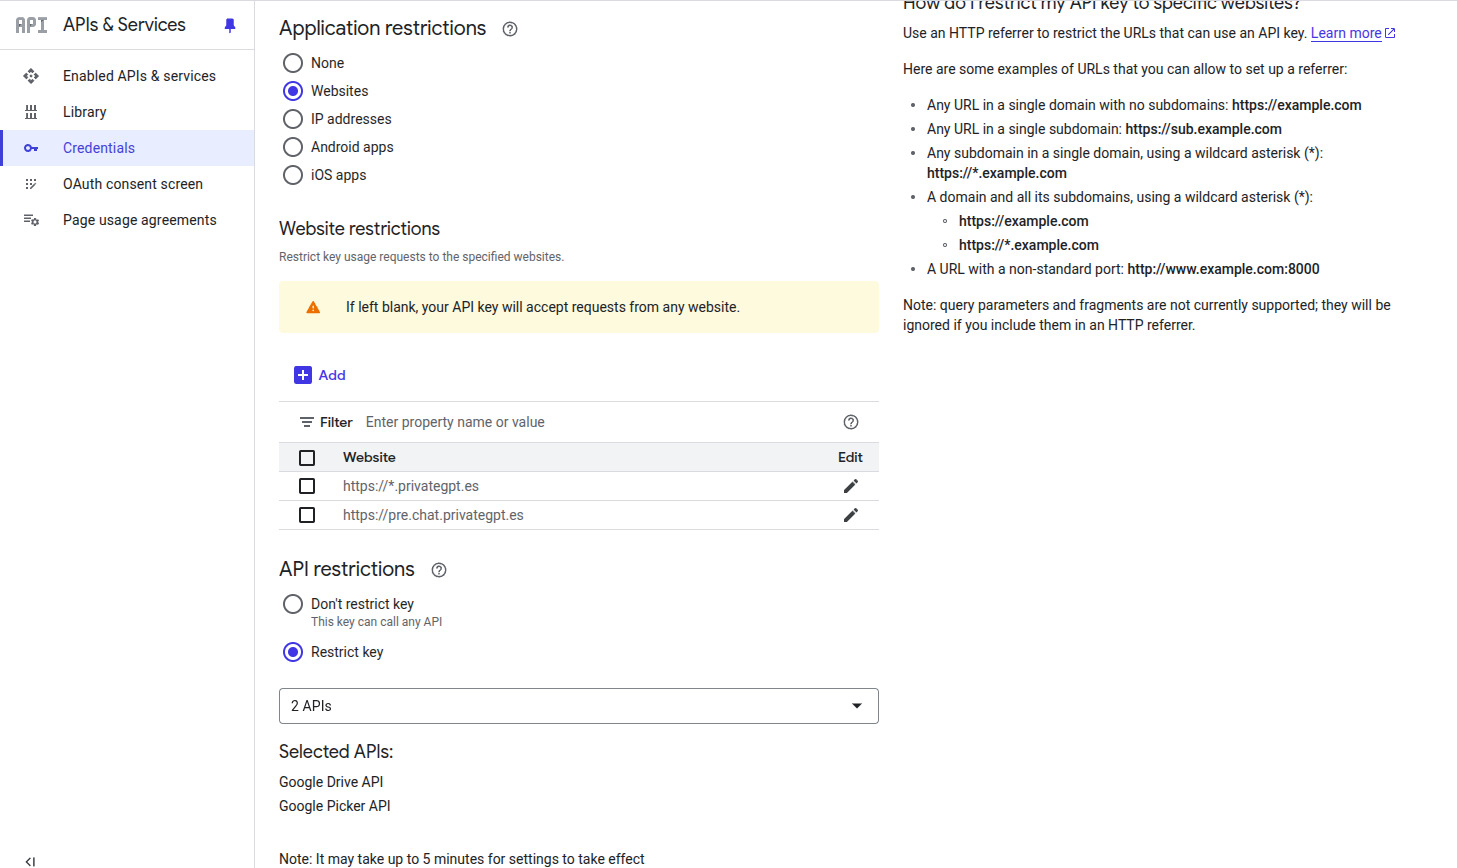
Step 2: Configure API Key Restrictions Click on your newly created API key to configure security restrictions:
Application Restrictions:
- Select “HTTP referrers (web sites)”
- Add your domain restrictions:
*.yourdomain.com(replace with your actual domain)https://chat.yourdomain.com(your specific Open WebUI URL)
If you’re testing locally, you might need to add http://localhost:* temporarily, but remember that we covered HTTPS deployment in the previous tutorial.
API Restrictions: Restrict this key to only the APIs we need:
- Google Picker API
- Google Drive API
Click “Save” to apply these restrictions.
Creating OAuth 2.0 Client Credentials 🔐
In addition to the API key, we need to create OAuth 2.0 credentials that will handle the authentication flow when users connect their Google Drive accounts.
Step 1: Configure OAuth Consent Screen Before creating OAuth credentials, we need to set up the consent screen:
- In the left sidebar, go to “OAuth consent screen”
- Choose “External” user type (unless you’re using Google Workspace)
- Fill in the required information:
- App name: “Open WebUI Google Drive Integration”
- User support email: Your email
- Developer contact information: Your email
Step 2: Create OAuth 2.0 Client ID Now let’s create the OAuth client credentials:
- Go back to “Credentials” in the left sidebar
- Click “+ Create Credentials” → “OAuth 2.0 Client ID”
- Choose “Web application” as the application type
Configure Authorized Origins and Redirects: This is crucial for security. You need to specify exactly where requests can come from:
Authorized JavaScript origins:
https://chat.yourdomain.com(Replace yourdomain.com with your actual domain)
Authorized redirect URIs:
https://chat.yourdomain.com(Same URL as above)
Important Security Note: Make sure you use your actual domain here. In my example, I’m using pre.chat.privategpt.es, but you should replace this with whatever domain you configured in the previous tutorial.
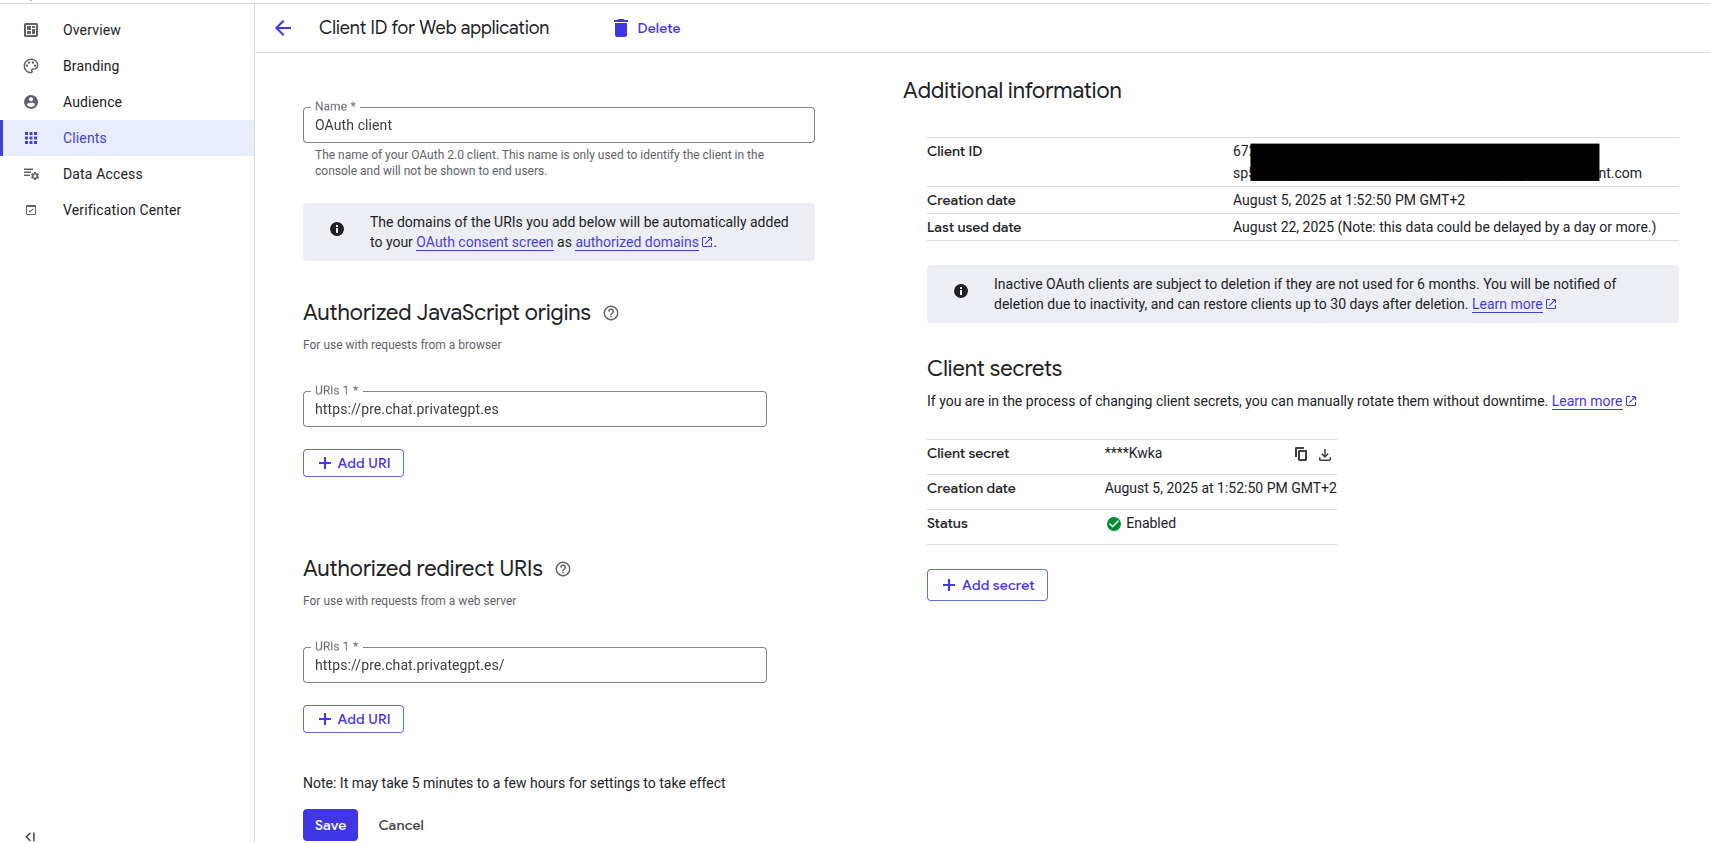
Step 3: Save Your Client ID After creating the OAuth client, you’ll see a popup with your credentials:
- Client ID: Usually starts with numbers like
672...– copy this to your text file - Client Secret: Also save this, though we’ll primarily use the Client ID
What We Have So Far: At this point, you should have saved in a plain text file:
- ✅ API Key (for Google Picker and Drive APIs)
- ✅ OAuth 2.0 Client ID (for user authentication)
- ✅ Your domain configuration
Configuring Open WebUI Environment Variables ⚙️
Now that we have all our Google credentials configured, it’s time to integrate them into your Open WebUI deployment.
Step 1: Access Your Repository Navigate to the terminal where you have your Open WebUI repository cloned.
Step 2: Configure Environment Variables Inside the repository, you’ll find an example environment file. We need to add the Google Drive integration variables:
# Copy the example file if you haven't already
cp .env.dist .env

# Edit the environment file
nano .env
Add these Google Drive configuration variables:
ENABLE_GOOGLE_DRIVE_INTEGRATION=True
GOOGLE_DRIVE_CLIENT_ID=672xxxxxxxx.apps.googleusercontent.com
GOOGLE_DRIVE_API_KEY=AIzaSyxxxxxxxxxxxxxxxxxxxxxxxxx
GOOGLE_REDIRECT_URI=https://chat.yourdomain.com
Replace the placeholder values with your actual credentials from Google Cloud Console.
Step 3: Restart Your Docker Containers After saving the environment variables, you need to restart your containers to pick up the new configuration:
# Stop the current containers
docker compose -f open-webui-compose.yml down

# Restart with the new environment variables
docker compose -f open-webui-compose.yml up -d --force-recreate
Important: The --force-recreate flag is crucial because it ensures Docker rebuilds the containers with your new environment variables. Don’t worry – this won’t delete your data, it just recreates the containers with the updated configuration.
Enabling Google Drive in Open WebUI Interface 🖥️
With our environment variables configured and containers restarted, we now need to enable the Google Drive integration within the Open WebUI interface itself.
Step 1: Access the Admin Panel
- Open your Open WebUI interface at
https://chat.yourdomain.com - Click on your profile picture in the top-right corner
- Select “Admin Panel” from the dropdown menu
Step 2: Navigate to Documents Settings In the admin panel, you’ll see various configuration sections. Look for the “Documents” section in the sidebar menu.
Step 3: Enable Google Drive Integration Within the Documents settings:
- Scroll down until you see the Google Drive option
- Toggle the “Enable Google Drive” setting to ON
- Click “Save” to apply the changes
You should see a “Settings saved successfully” confirmation message.
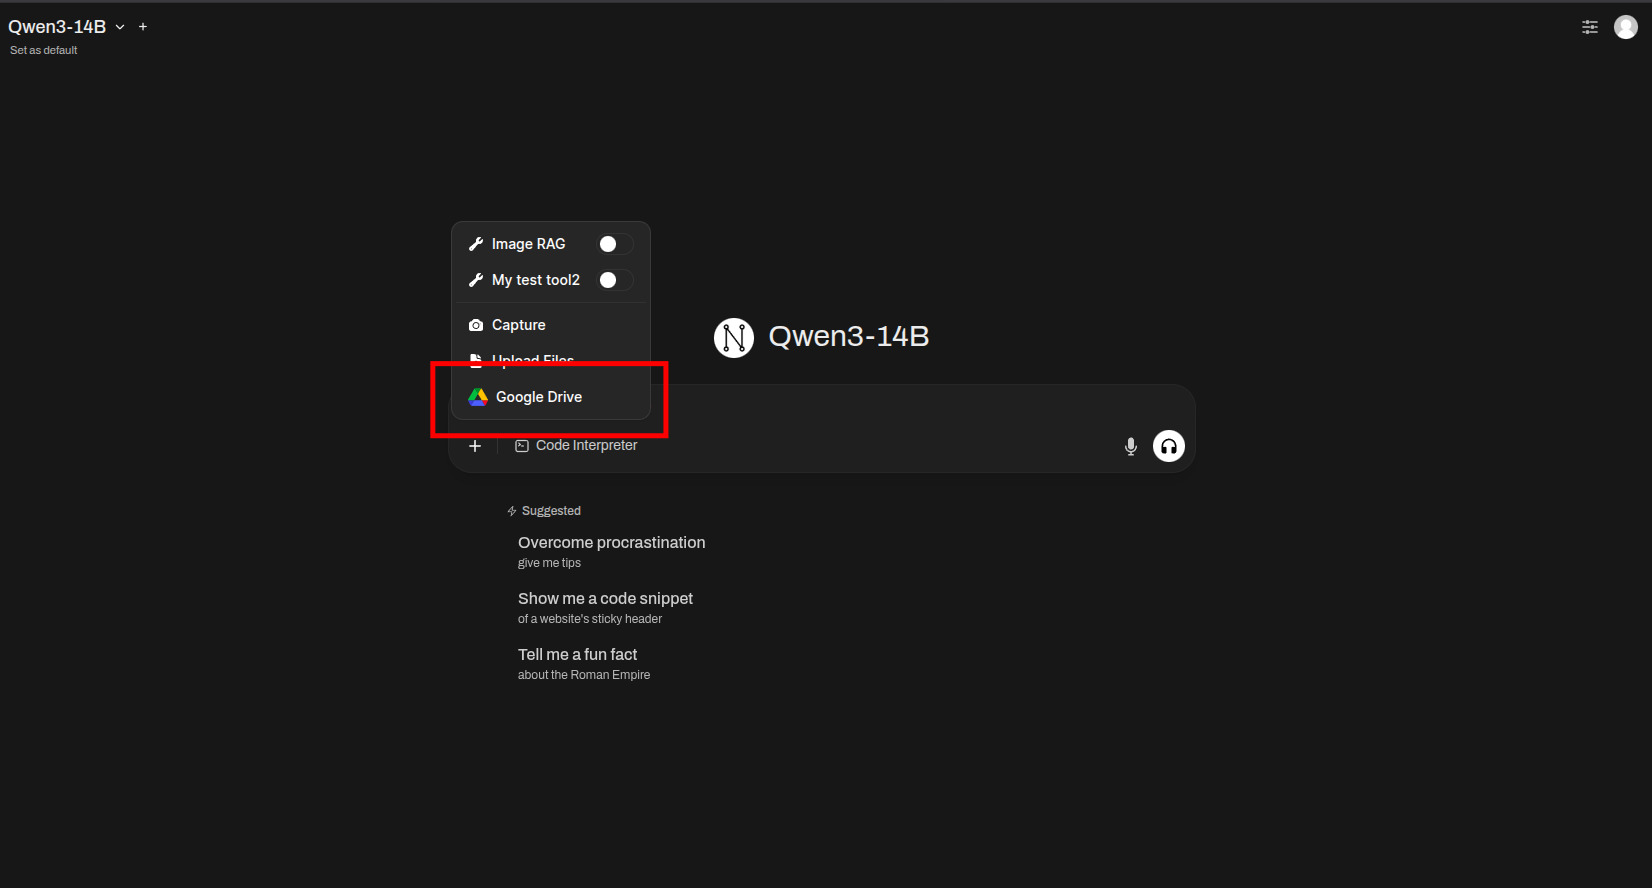
Step 4: Refresh and Verify After saving, refresh your browser page. You should now see “Google Drive” appear as an option in your document upload interface.
And that’s it! You now have a complete private AI document chat system that combines the convenience of Google Drive and Open WebUI with the privacy of your own AI infrastructure.
Need Professional AI Deployment for Your Business? 🏢
While this tutorial shows you how to integrate Google Drive with Open WebUI manually, many enterprises need more sophisticated document intelligence solutions. That’s exactly what we specialize in at NeuralNet Solutions.
Why Choose Professional Document AI Deployment? The integration we’ve covered today works great for personal use or small teams, but enterprise document processing requires additional capabilities:
- Advanced Document Processing: OCR, multi-format support, and intelligent document parsing
- Enterprise Security: Advanced encryption, audit trails, and compliance frameworks
- Scalable Architecture: Handle thousands of documents and concurrent users
- Custom Integrations: Connect with SharePoint, Confluence, and other enterprise systems
- Advanced Analytics: Document usage insights, search analytics, and performance metrics
Introducing PrivateGPT Document Intelligence 📊 Our enterprise solution transforms basic Google Drive integration into a comprehensive document intelligence platform:
✅ Multi-Source Integration: Google Drive, SharePoint, Dropbox, local file systems, and databases
✅ Advanced RAG Pipeline: Sophisticated chunking, embedding, and retrieval strategies
✅ Document Preprocessing: Automatic OCR, format conversion, and metadata extraction
✅ Team Collaboration: Shared document libraries, annotation tools, and knowledge bases
✅ Compliance Ready: GDPR, HIPAA, and SOC2 compliant deployments
✅ Custom Models: Fine-tuned models for your specific document types and industry
What you get in our 30-minute consultation:
- Document workflow analysis and optimization recommendations.
- Live demo with your actual documents (in a secure environment).
- Custom architecture design for your infrastructure.
- Transparent pricing discussion.
📅 Book Your Free Consultation – No sales pressure, just expert advice on whether document AI makes sense for your organization.
Questions? Let’s Talk:
- 🌐 Website: neuralnet.solutions
- 💼 LinkedIn: Connect with Henry
Don’t let your team waste time searching through documents. The organizations implementing private document AI today will have a significant competitive advantage tomorrow.
Conclusion 🏁
You now have a powerful document intelligence system that combines the convenience of Google Drive with the privacy and security of your own AI infrastructure. Your team can chat with any document from Google Drive while ensuring that all processing happens on your dedicated NVIDIA GPUs – no data ever leaves your environment.
This integration opens up exciting possibilities for document-driven workflows, knowledge management, and AI-assisted research, all while maintaining complete privacy and control over your sensitive information.
The combination of Google Drive’s accessibility with private AI processing creates the perfect balance between convenience and security – exactly what modern businesses need in today’s data-sensitive environment.
If you found this tutorial helpful, consider supporting my work and stay tuned for more advanced AI deployment guides. The future of private AI is here, and you’re now equipped to be part of it.
Support this content: If you liked this post, you can support me here ☕😃
Keywords: Google Drive Open WebUI integration, private document chat, Google Drive API Open WebUI, document AI privacy, Google Drive RAG integration, private ChatGPT documents, Open WebUI Google Drive setup, enterprise document AI, Google Drive API tutorial, private document processing, OpenWebUI with Google Drive, Google Drive with OpenWebUI
Learn how to integrate Google Drive with Open WebUI for private document chat. Complete tutorial with Google Cloud API setup, OAuth configuration, and secure document processing on your own infrastructure.